Troubleshooting
Introduction
As we’ve covered in the home section, Toro are widely regarded as one of the best manufacturers of not just weed eaters and trimmers, but a variety of outdoor power tools. While the company are known for their highly reliable tools and comprehensive servicing schemes, it’s important to remember that these are still power tools at the end of the day and are hence susceptible to occasional bouts of malfunctioning due to wear and tear. Fortunately, most of these are minor issues that can be fixed right at your own home garage with no need to visit a service centre. It’s important however, that you do visit a technician if you are not experienced in handling power tools.
Ensure that it’s safe to use the weed eater/trimmer
Always remember to prioritise your safety above all else, no matter what the scenario. No machine is worth risking injury or fatality!
- Never operate the weed eater in the presence of young children or infants.
- Ensure that pets are safely in the house or out of the way when you are operating the unit.
- Always check the length of your trimming line before you begin each session – ensure that your line is neither too long nor too short as this can damage the machine or cause potential injury.
- Ensure that you wear appropriate clothing when operating the unit.
- Do not attempt to operate the power tool under the influence of any medication or intoxicating agent.
- Remember to go through the instructions manual thoroughly before attempting to operate the unit for the first time.
- Never leave the unit switched on and unattended.
- Clear out the area that you intend to trim of stones, rocks and other obstacles before you begin.
- Use the trimmer in the daylight, or ensure that there is adequate lighting if you will be using it at night.
- Never handle gasoline inside a closed space, always fuel the machine in well ventilated areas.
- Carry out periodic maintenance of the machine as indicated in the maintenance guide.
- Practice caution when using the unit at higher extremities of the plants you are trimming.
- Never use the weed eater while standing on a ladder or on a tree.
- Do not attempt to operate the unit with one hand – you need to use two hands to gain proper control over the unit.
- Do not allow children or inexperienced adults to handle the weed eater.
Ensure that you’re familiar with the various parts and controls on the trimmer
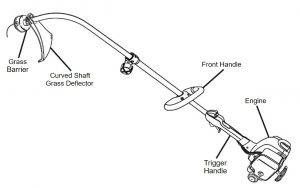
Ensuring that you are thoroughly up-to-speed with all the trimmer’s controls and various features is critical to the same handling of the unit. Make sure that you spend the time to go through the instruction manual in detail to learn these facilities – a few of them have been mentioned here.
- The cord retainer enables you the pull out the length of nylon string when passing it through the eyelets, enabling you to pull string up the entire length of the unit every time you change the string. The retainer also ensures that the amount of string being fed to the motor is always kept in check.
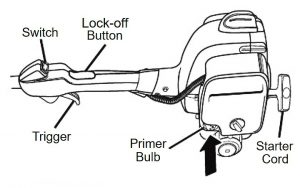
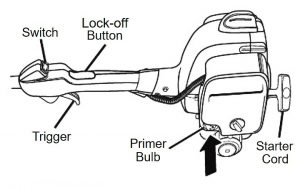
- The trigger switch is used to fire the motor and trigger rotation of the main shaft head – the switch can be set to trigger the highest speed setting for maximum power or a lower setting for longer range.
- The recessed plug is used to charge the unit at the end of its battery life, by plugging into the appropriate voltage socket as specified in the instruction manual.
- Assist handle is an additional gripping apparatus provided at roughly around the midsection of the unit in order to facilitate handling the trimmer, especially when trimming hard to reach areas.
- The air vents are crucial in allowing hotter air to emanate from the unit and keep the operational temperature of the trimmer at a more controlled level
- The shield or guard plate is critical to ensuring that the unit is always used safely and nobody is put at risk, by offering an obstruction between the rapidly spinning nylon and the operator’s body.
- The motor is the primary unit driving the rotational motion of the trimmer and transmitting power from the battery pack to the rotor head.
- The trimmer head enables the string to be kept in check and offers a stable platform on which the nylon is mounted during the rotational motion of the weed eater.
- The line limiter is used to prevent the length of the trimming string from exceeding the maximum value as a string that is too long can inhibit the performance of the motor and cause loss is efficiency.
Operational instructions
Ensure that you’re wearing all the appropriate protection before you begin to use the unit – it’s important that you do not attempt to use the trimmer without the proper safety gear as this can severely increase the potential for dangerous injury or even damage to the unit itself.
Ensuring that you are thoroughly up-to-speed with all the trimmer’s controls and various features is critical to the same handling of the unit. Make sure that you spend the time to go through the instruction manual in detail to learn these facilities – a few of them have been mentioned here
Operating position and posture
Use that you are wearing eye protection and are maintaining proper posture when using the string trimmer. Operating the weed eater for long periods without appropriate protection and proper posture can cause fatigue and decrease your efficiency as well. It is mandatory that you stand with you back straight and your arms holding the unit straight out in front of you without bending over – do not let the head of the trimmer rest completely on the lawn surface when the unit is not turned on. It is highly recommended that you adorn heavy protective clothing and boots at all times when operating the trimmer. Keep you right arm slightly bent forward without leaning and using the left arm held out straight to position the trimmer, trim in long sweeping motions making a wide arc with the device.
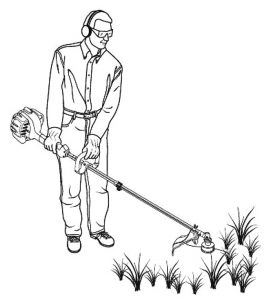
It’s recommended that you allow the unit to reach full speed before you trim because using the weed eater at lower speeds can register an increased tug on your arms and therefore lead to fatigue. Release the trigger switch at any point when you’re not cutting.
Troubleshooting
Like any other trimmers, Toro weed eaters may encounter some most common faults. You are more than welcome to use the below troubleshooting table to deal with most common issues.
Table 1. Toro trimmers troubleshooting table applicable for all models
| Issue | Possible problem | Possible solution |
| Difficulty getting the trimmer to start | Trigger mechanism may be blocked | Lubricate the motor and the trigger mechanism and clear out any debris that may have accumulated. |
| Battery not installed properly | Check to ensure that the battery has been properly connected and the latch has been secured | |
| Charging of battery has not been completed | Check the battery charge indicator lights to ensure that the battery has enough charge, if the lights are below the indicated level, charge the battery | |
| Lock may be activated | Ensure that the lock-off switch mechanism has been disable by completely pulling the switch back and moving the trigger once again | |
| Weed eater shuts down without warning | Battery charge too low | Check the battery charge indicator lights to ensure that the battery has enough charge, if the lights are below the indicated level, charge the battery |
| Accumulation of debris | Ensure that you regularly clean the area around the device’s spool to remove any debris or clippings that may have accumulated over time | |
| Swath length too long | Ensure that the length of the cutting line swath does not exceed the 13 inch or 330 mm mark and reduce or limit it to this mark if it is too long | |
| Guard may have come loose | Reinstall the guard or replace it with a new one if the piece has come loose | |
| Unable to charge the trimmer | Power outlet or socket may be damaged | Ensure that the outlet you’re using to charge the battery is not faulty and has proper current flow. Check the current at the outlet by pluggnig another electrical appliance |
| Battery terminals have corroded | Check the battery’s terminals for corrosion as this can also prevent it from charging | |
| String trimmer motor too slow | Speed trigger not pressed properly | Ensure that you have pressed the speed trigger all the way down and that the button is completely depressed before you proceed mowing |
| Battery may not be properly secured | Remove the battery from the device and reinstall it to ensure that it has been properly secured in place until you hear an audible snap from the latch | |
| Spool housing may be stuck | Inspect the spool housing to make sure that the line rotor is able to freely rotate smoothly, if not replace the spool with a new piece | |
| Too much line length | The cutting line must not be longer than the tip of the trimming blade as this can reduce the motor speed and impair cutting efficiency – ensure that the line has been cut to the right length | |
| Too much vibration from weed eater | Spool is not wound properly | Ensure that the spool has been wound properly around both the edges of the unit and that the spool is in good condition – replace the spool if necessary |
| Cutting line too long | The cutting line must not be longer than the tip of the trimming blade as this can also cause excessive vibration in addition to lowering the unit’s cutting efficiency – ensure that the line has been cut to the right length |
Different cutting methods to get the best out of your weed eater
There are a number of different cutting methods you can employ in order to ensure maximum efficiency and enable yourself to completely optimize your weed eater for full functionality. We’ll go through a few of them below.
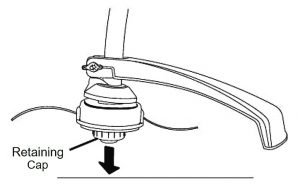
Proper trimming is achieved when you hold the bottom of the weed eater at a height of about 8 inches from the ground while the trigger has been compressed. The idea is to allow only the nylon line to come in contact with the ground. Never attempt to force the trimmer head itself into the working area as this may cause considerable damage to the unit.
Scalping is another popular technique that enables you to remove a large amount of unwanted vegetation and growth by shifting the grip with which you hold the weed eater. Hold the underside of the trimmer head at a height of roughly 3 inches from the ground and at an angle to it – this allows only the tip of the trimmer to come in contact with the working surface and hence allows for far greater precision.
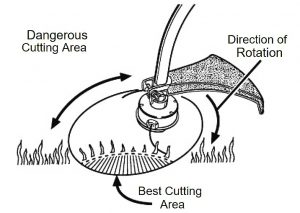
You can also employ the mowing technique to remove a flat horizontal layer of growth from the working surface as the weed eater is perfect for use in conventional places that are beyond the reach of the bigger lawn mowers. Simple hold the head parallel to the ground the way a traditional lawn mower’s blades operate.
The sweeping motion can also be applied to this regard in order to achieve similar results by using just the very tip of the rapidly rotating line to make more delicate cuts.
Toro weed eater maintenance
Weed eaters require regular maintenance in order to keep expected cut quality, be safe and last long
Table 2. Obligatory maintenance works schedule for Toro weed eaters
| Maintenance interval | Action |
| Daily | Inspect the guard |
| Clear out debris from motor | |
| Clean trimmer head | |
| Weekly | Clean battery terminals |
| Check nylong string length | |
| Check guard stability and main screws on housing | |
| Inspect the shaft | |
| Every 90 days | Inspect the four guard screw bearings |
| Inspect the motor fastenings | |
| Yearly | Inspect the four guard screw bearings |
| Inspect the battery voltage for discharge | |
| Inspect the spool and replace if necessary |
Caring for the weed eater after use
It’s important that you regularly change the parts that are subjected to the most wear and tear in order to prevent long term degradation of the trimmer. Changing the cutting nylon line from time to time is an important part of the process. Gradually unspool the remaining line from the unit. Now check your manual to learn the specifications of your trimmer, and cut out the required amount of line – this length could vary across several inches. Feed the new line through the eyelet and into the spool until it protrudes through the second eyelet. When wrapping line across the spool, ensure that you always wrap in a counterclockwise direction as specified in the main manual. Remember that the lock ring must be turned counterclockwise to remove it as well.
Make sure that you also check the condition of the spool from time to time in order to ensure that it will not break off – this can cause serious damage to the internal workings of your trimmer and will often require an expensive service. It will also probably put additional stress on the unit’s main motor and this can significantly decrease its overall lifespan. To remove the older spool, slowly twist the housing case in which the spool in fixed so that the marked hole within the spindle lines begins to align itself up perfectly with the same notched marked by an indication, located on the inside of the trimmer’s guard.
The unit’s primary housing hole will slowly become visible when this happens, and this third hole will gradually begin to align with the two holes on the outside of the weed eater. You may now proceed to insert a heavy duty screw driver or something similar such as a hard rod through all of the three primary holes as a plug stop to help prevent the housing of the unit from rotating any further. Ensure that the spool, hub, lugs and the tap button have all been properly replaced after this.